How to generate a funscript from video
Use FunGen to generate a starting stroke track from supported 2D or VR video, review it on the timeline, and save a standard funscript. Start with a short preview of your own footage before committing to a full run.
Updated 11 September 2026 · FunGen 2.6.3
1. Prepare the app and a representative clip
Download the official archive for your operating system and processor, extract it, and keep its files together. FunGen 2 does not require you to install Python. Open a local video by dropping it into the window or using the File menu.
Pick a clip that represents the material you intend to process: camera angle, lighting, framing and VR projection affect the result. A clear ten-second span does not demonstrate that every section of a long video will track equally well.
2. Check the model, format and preview
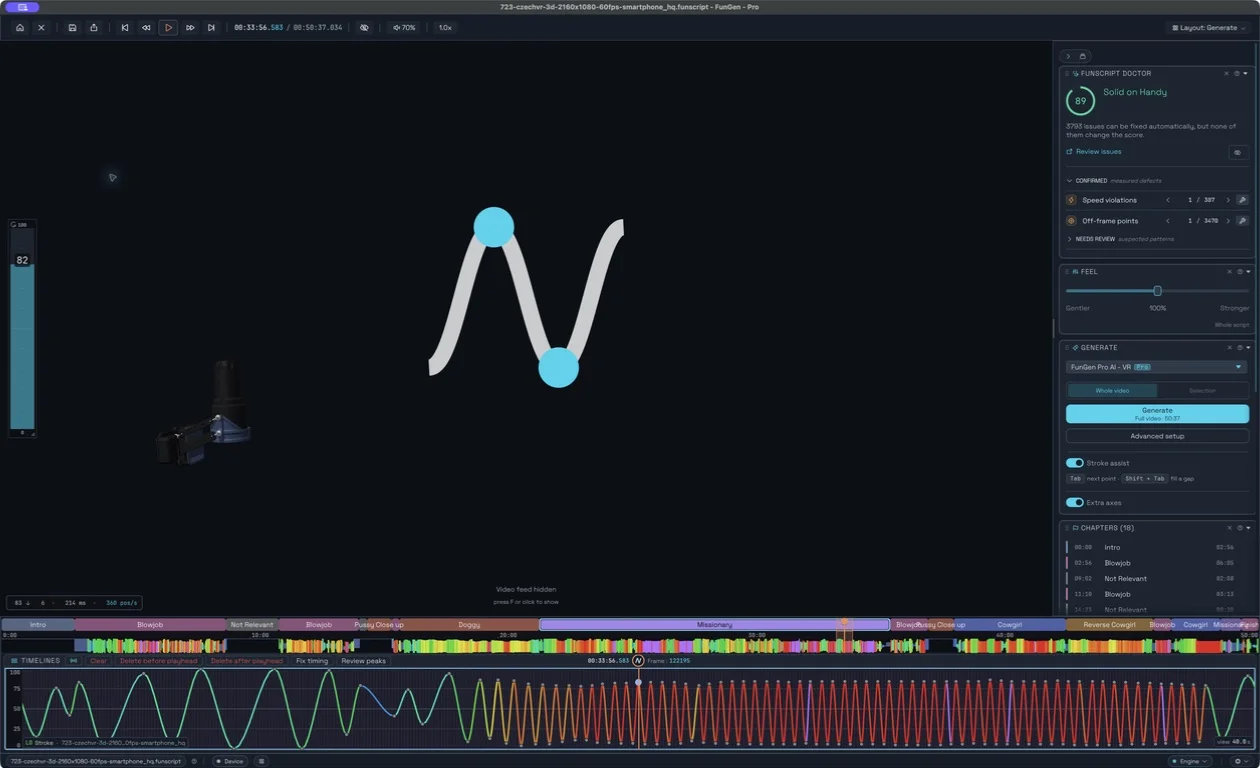
The Generate controls offer a model and a scope such as Whole video, Selection or Batch. Use the flat model for 2D footage and the VR model for headset footage. Check the detected VR layout if the preview looks distorted or shows the wrong eye.
Run the included 20-second AI preview on a representative span. Compare the generated stroke with the visible motion. Free previews have a daily allowance; they are an evaluation of the AI, not unlimited full-video generation.
3. Generate the selected scope
With a valid Pro pass, choose Whole video for a complete script or select a specific time range to work on. Check the scope and any replace or merge prompt before starting: a new generation can overlap points you already edited. Save your existing work first.
The AI's primary output is the stroke track. For eligible whole-video VR runs, Pro's optional Extra axes switch adds synthesized roll, pitch, twist, surge and sway. Those auxiliary movements are generated to suit the script; they are not measurements of body pose from this video. Leave the switch off if you want only the stroke, or author the extra tracks yourself.
Generation speed depends on the video, hardware, model and available memory. Preview and time one representative file before queuing a library. There is no universal frames-per-second promise.
4. Review the result before exporting
Inspect motion changes, camera cuts, long pauses and difficult sections. Use timeline editing and transforms to adjust timing or range. Run the Doctor to identify issues such as excessive requested speed, and preview proposed fixes before applying them. Its score is a diagnostic aid, not a guarantee of how every device will feel.
Save your editable project with Save project. Use Save funscript for the motion file you will pair with a video. For multiple axes, use Export multi-axis funscript and choose the separate or combined format supported by your player in Preferences → Export.
5. Test playback, then scale up
Keep the script and the matching video edit together. Check synchronization near the beginning and later in the clip. Follow the playback guide and the guide for your device. Once a complete single-file run works, use Batch for more files with the same checked settings.
If the result is unexpected
- Wrong projection or distorted preview: verify 2D versus VR, projection and stereo layout before rerunning.
- Good timing but too much motion: adjust the script's range or use the appropriate transform, then inspect device limits.
- Weak tracking in one section: isolate that span, try another preview and edit it manually if necessary. Repeating the same settings does not guarantee improvement.
- No extra axes: check that this is an eligible whole-video VR Pro run and that Extra axes is enabled. It does not apply to every model or scope.
- A run fails: note the version, platform, model, file format and error message when contacting support. Start with a short reproducible clip.
AI processing is local. Optional services have their own network connections; see Privacy. One-off Pro purchases and monthly memberships are explained separately on Pricing.